In This Article
Introduction
From start-ups to small businesses to restaurants to technology companies, it is easy to find a WordPress website with 10, 15, or 20 MB of image data. It is too easy to add large images to WordPress, but fortunately it is also easy to optimize images and save visitors a lot of time waiting for images to download.
I am kicking off the Turtle to Rabbit WordPress optimization series with image optimization. I will work on my Pretend Web Design webpage built to showcase image problems as well as many of the optimization issues I come across. I believe optimizing images will bring the biggest improvement for mobile users. By the end of this series we will know if I am right…let’s get started!
Find Unoptimized Images
I use the GTmetrix PageSpeed recommendations and GTmetrix Waterfall file list to give me a good overview of a webpage’s images.
Check PageSpeed Recommendations
I first check two PageSpeed recommendations:
- Serve scaled images
- Optimize images
If either of these two grades are less than less than the high 90’s, there are some optimizations that can be done.
- I go to GTmetrix
- Enter the URL to analyze and click the Analyze button.
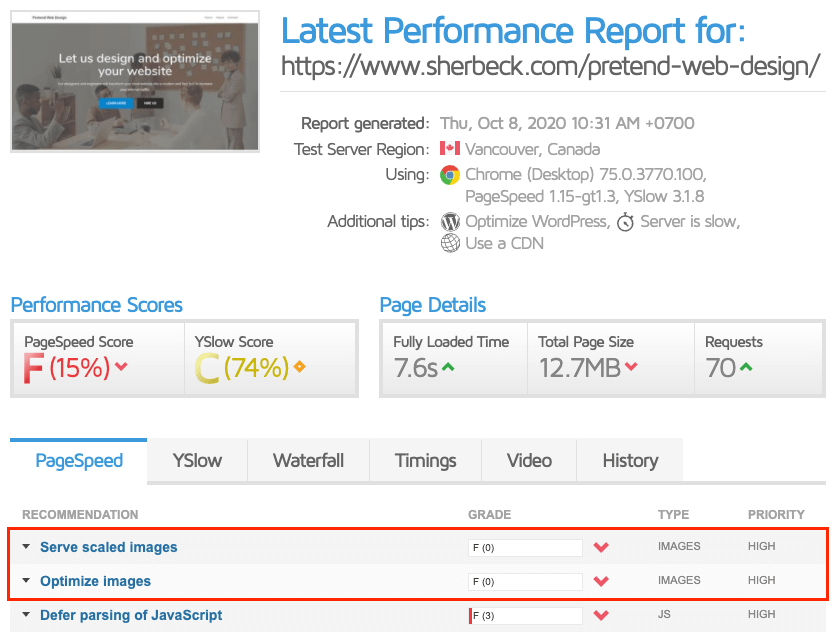
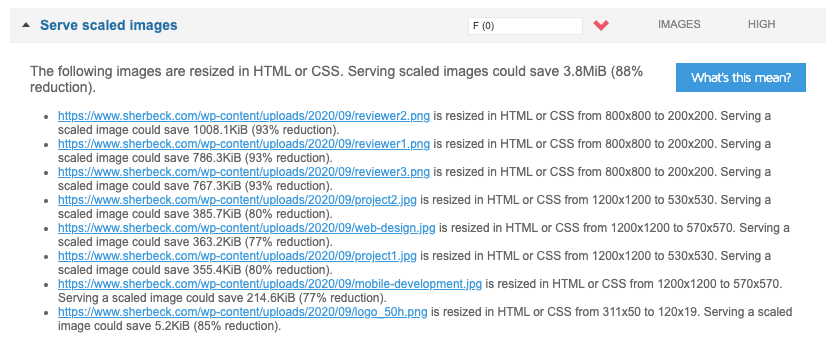
Pretend Web Design fails miserably as these two metrics have a grade of “F (0)”.
What do these scores mean exactly?
- A bad Serve scaled images grade tells me I have images whose dimensions are too big for what is actually displayed on the webpage.
- A bad Optimize images grade tells me I can improve the compression of my images and possibly choose a better-suited image format.
Check Waterfall File List
I check the Waterfall file list to answer two questions about a webpage:
- Are there any large image files (i.e. over ~400 KB)?
- Are there too many images and are they all needed?
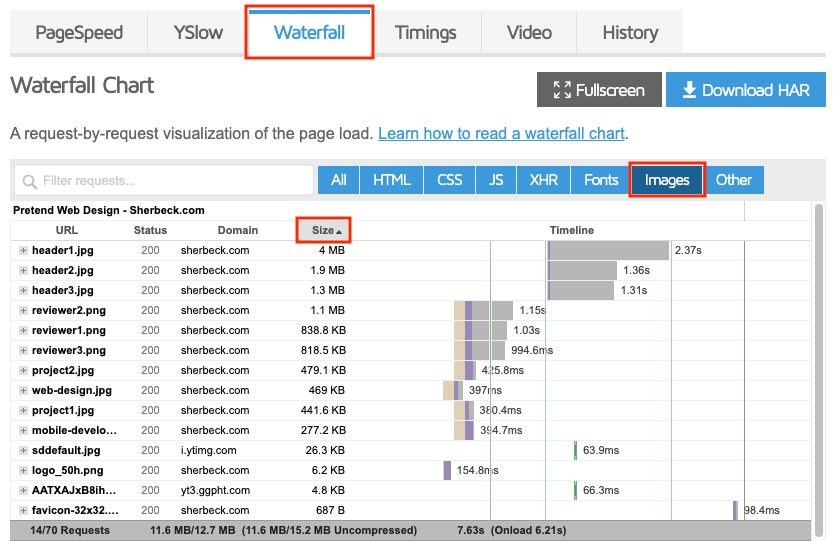
- With same GTmetrix report page open from above, I click the Waterfall tab.
- Filter the file list by Images.
- Click the Size column header twice to sort descending.
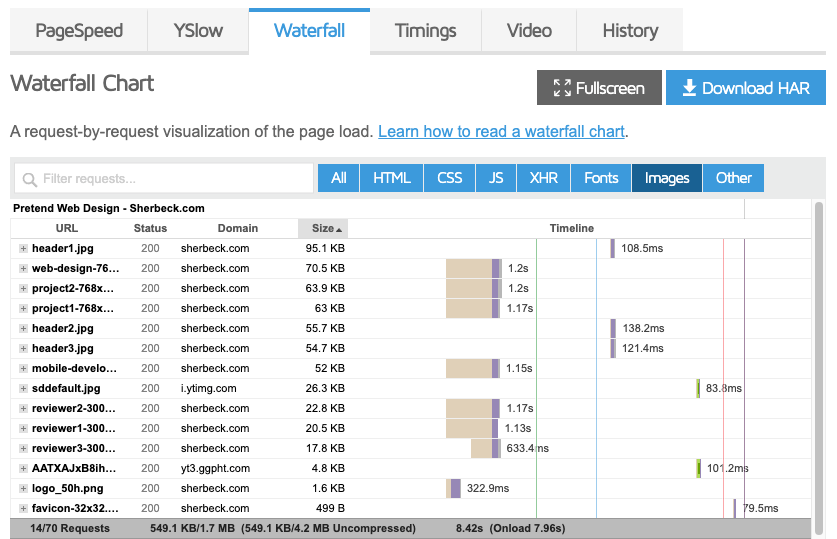
We end up with a list of images sorted biggest to smallest. The gray bar at the bottom of the list summarizes the combined size of the images – 11.6 MB out of 12.7 MB total – and the number of images – 14 images out of 70 total requests.
Image Sizes
I first check the file sizes and there are some very large images; 9 images are over 400 KB. Unless you are a photographer or have a true need for high quality images, there are very few reasons to have an image over 400 KB.
The fact that I have such large image files indicates – and confirms the PageSpeed recommendation – that some images need better compression, need smaller dimensions, or both.
Image Count
The second thing to check is the image file count. My webpage has 14 images which is a very reasonable number and is what I expected.
There are no hard and fast rules about how many images are too many, but if the count is higher than you expected, then it is a good idea to investigate why there are more than expected and if any can be removed.
Optimize Existing Images
I go through four steps when optimizing an image:
- Check the file type
- Size the image
- Reduce quality
- Compress
(If you want a more in-depth discussion of this process, the best article I have found is “Graphical Content” by Dave Gash on the Google Developers website.)
I will use the ShortPixel Image Optimizer plugin to optimize my images. It is a freemium plugin with a limit of 100 free credits (image conversions) per month which is enough for my needs (or so I thought – by the end of this article I ended up buying 10,000 credits for a very reasonable $10).
Before I start optimizing, I create a free account and then configure the plugin to not automatically optimize media.
I want control of image optimization on an image-by-image basis, so on the “ShortPixel Plugin Settings” Advanced page, I uncheck the Optimize media on upload option.
Check File Types
The first thing I check is whether the images are of the appropriate type. I generally use just JPG and PNG since they are supported by all major web browsers. JPGs are best for photographs and PNGs are best for line art, drawings, or if you need transparency.
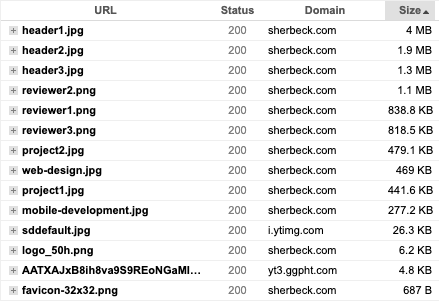
Taking a look at the GTmetrix Waterfall image list above, I see there are three PNG photographs; reviewer1.png, reviewer2.png, and reviewer3.png. These photographs should be converted to JPG. The other two PNGs, logo_50h.png and favicon-32×32.png, should be left as PNG since they contain transparency.
The ShortPixel plugin has an option to Convert PNG images to JPEG, so I will enable it on the “ShortPixel Plugin Settings” Advanced page. I leave “Also force the conversion of images with transparency.” disabled so that logo_50h.png will not be converted to JPG.
The ShortPixel PNG settings are now ready for when I run the ShortPixel optimization in the Compress step.
Size Appropriately
Returning to the PageSpeed Serve scaled images recommendation, we see that 8 out of 14 images are listed as too big in dimension.
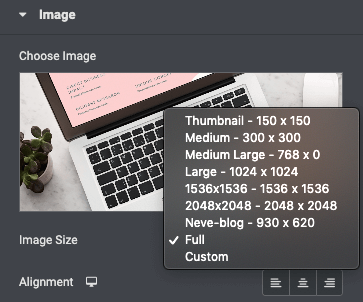
I am using the Elementor page builder which lets me set the image size. I see that almost all the images on Pretend Web Design are set to “Full”, so I will set the images to one of the sizes in the following list:
- Thumbnail – 150 x 150
- Medium – 300 x 300
- Medium Large – 768 x 0
- Large – 1024 x 1024
- 1536×1536 – 1536 x 1536
- 2048×2048 – 2048 x 2048
- Neve-blog – 930 x 620
- Full
- Custom
How do I know which size to pick?
I want to chose an image size equal to or greater than the size used by the browser. If I choose a smaller size the browser will stretch the image to fit and it will not look good.
If I have already run the GTmetrix test, then the “Serve scaled images” recommendation tells me the optimal size. Otherwise, if I am in the middle of designing a page I have a few options as described below.
Estimate Size
I can estimate based on the knowledge that my pages’ content width is 1140 pixels. Four of the images are set exactly to or very close to half that (570 pixels), so for these images I choose “Medium Large – 768 x 0”.
Widget Image Size Property
Some widgets let you set a specific image size as in the case with the Testimonial widgets used for the three reviews near the bottom of the page. The reviewer images are set to 200 pixels wide, so the choice here is “Medium – 300 x 300”.
Inspect Size With Web Browser
To get the exact dimensions of an image as displayed in the browser, I…
- Open a page in a web browser (tested with Chrome, Firefox, and Safari).
- Right-click anywhere on the page and select “Inspect” or “Inspect Element”. The developer tools will open in a panel usually at the bottom of the browser.
- Click the element selector tool located near the top left of the developer tools window.
- Hover the mouse over the image and the exact size will be displayed.
What if I can’t set the image dimensions?
The header images header1.jpg, header2.jpg, and header3.jpg unfortunately do not have a size control in Elementor. These images have huge dimensions, so I need to size the files directly.
“ShortPixel Plugin Settings” has a Resize large images on the General tab that resizes photos to a maximum size. As shown in the picture above, I am setting the maximum width or height to be 1536 pixels. This will take care of sizing the header images to reasonable dimensions when I run the ShortPixel optimization.
Reduce Quality
Reducing the quality of the images will make a huge impact on the file sizes. It is possible to reduce file sizes dramatically with no or very little noticeable difference.
On the “ShortPixel Plugin Settings” General page, you can choose the degree of compression; Lossy, Glossy, or Lossless.
I found the Lossy setting to be a bit too aggressive for all but the header images, so I will optimize all except the headers with Glossy. When I optimize in the next step, I will come back to this setting, set it to Lossy, and do a second run with just the header images.
Compress
With the ShortPixel plugin settings all configured for my needs, it is time to optimize and compress. I will manually run a bulk ShortPixel optimization from the WordPress Media Library.
- I go to the WordPress Media Library.
- Select the images I identified for Glossy compression; mobile-development.jpg, web-design.jpg, project*.jpg, reviewer*.png, and logo_50h.png;
- In the Bulk actions drop down, I select Optimize with ShortPixel and then click the Apply button.
Once complete I go back to the “ShortPixel Plugin Settings” General page, select Lossy compression, Save Changes, and return to the Media Library. I then select the three header images and Apply the same Optimize with ShortPixel bulk action.
There is one final image I have not addressed which is favicon-32×32.png. It is not in my Media Library because I manually uploaded the favicons to my web host. I will use TinyPNG to optimize my favicons and then upload the files using Hostgator’s File Manager.
Test
Now that image optimization is complete, I test again with GTmetrix.
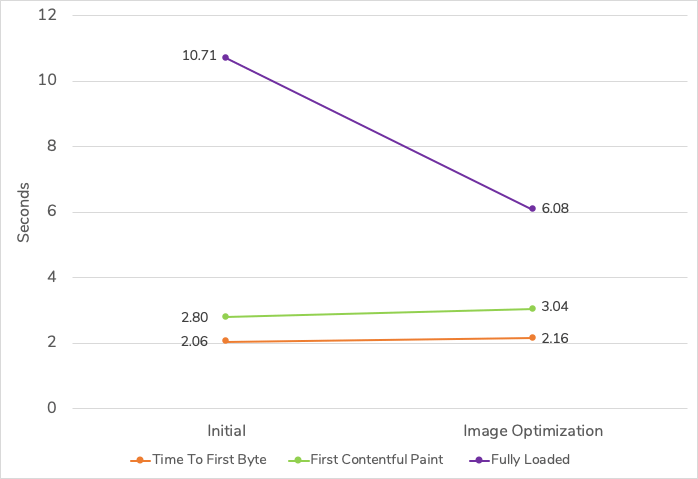
The results show the image data was reduced by an incredible 11 MB and the “Serve scaled images” and “Optimize images” metrics now get an A grade of 99.

Plan for Future Images
I have now addressed existing images, but I need a plan for future images that are added to this site. Because it’s only me and I don’t add a lot of images, my choice is to optimize with TinyPNG before uploading. It is really easy to use and it’s free. I will disable the ShortPixel Image Optimizer plugin for now and enable it in the future if I need to do bulk image optimization.
If the situation was different and other people would upload images, I would keep the ShortPixel Image Optimizer plugin enabled and turn on the Optimize media on upload option. There are also many other plugins I could have chosen to do this same work; EWWW Image Optimizer, Imagify, Smush, etc.
A final note: make sure WordPress is up-to-date with the latest version. Starting with the WordPress 5.3 release, WordPress automatically scales and optimizes images over 2560 pixels in width or height to a maximum of 2560 pixels (2560 can be changed or the feature disabled completely). This is a great feature for sites with less experienced users and prevents a 4000 x 4000 pixel image straight from a phone or digital camera from getting directly published.
Results
| Test | Time To First Byte | First Contentful Paint | Fully Loaded | Total Page Size | Requests |
|---|---|---|---|---|---|
| iPhone 7, Dallas | 2161 ms | 3040 ms | 6079 ms | 1.835 MB | 68 |
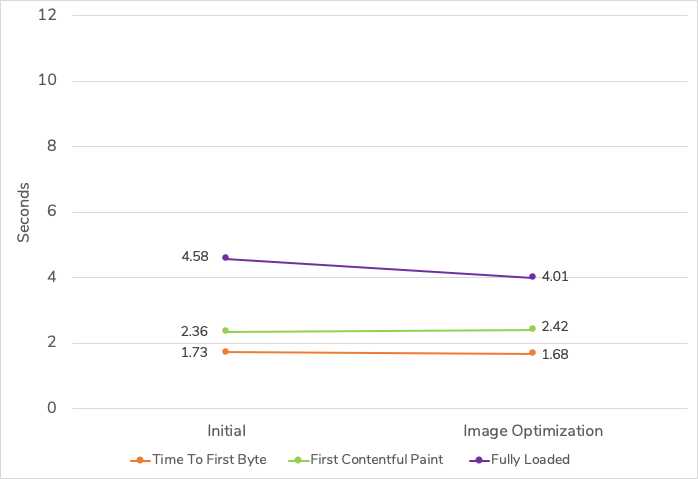
| Desktop, Dallas | 1683 ms | 2415 ms | 4005 ms | 1.727 MB | 70 |
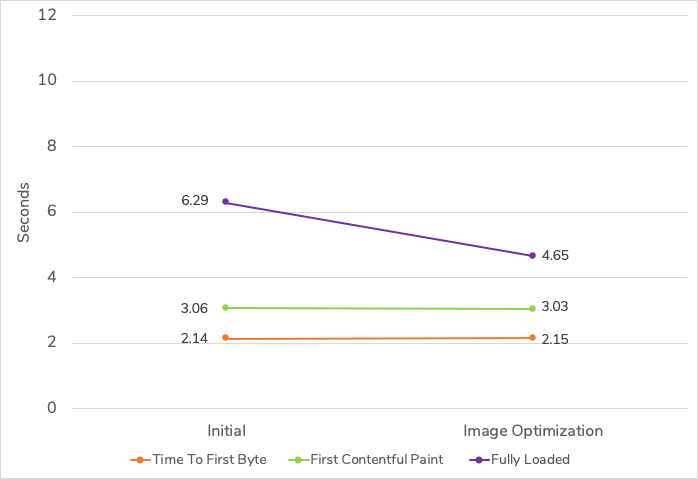
| Desktop, London | 2147 ms | 3033 ms | 4654 ms | 1.727 MB | 70 |
Tests performed with GTmetrix on URL https://www.sherbeck.com/pretend-web-design/. Median values, collected hourly over 24 hours.
Page Timings
iPhone 7, Dallas
Desktop, Dallas
Desktop, London
Total Page Size

One surprising data point is the total page size for the iPhone; it went from 1.872 MB less than desktop in the initial test to 111 KB more than desktop after optimizing images.
Looking into the initial test a bit deeper, I see the original, very large images were downloaded for desktop whereas the browser on the iPhone chose to download smaller-sized images in some cases. This accounts for the 1.872 MB difference in the initial tests.
Why isn’t the data size about the same for iPhone and desktop after image optimization? The reason is the iPhone can display an image with two times the dimensions than desktop. This makes the images look sharper on the iPhone (i.e. Retina display). For example, I chose the 300 x 300 pixel reviewer*.jpg images in Elementor. The desktop browser downloads the 300 x 300 pixel image, but the iPhone browser chooses to download the 768 x 768 pixel image (the next size bigger than 600 x 600 pixels). These larger size images account for the extra 111 KB after image optimization.
Summary
The table below shows the performance gains from optimizing images on Pretend Web Design.
| Test | Time | Data |
|---|---|---|
| iPhone 7, Dallas | ||
| Desktop, Dallas | ||
| Desktop, London |
(Time = Fully Loaded; Data = Total Page Size)
Optimizing images had the biggest impact on mobile by reducing the page load time 4.6 seconds. I am still another 4 seconds from my fully loaded mobile goal of 2 seconds, but this was a major step forward.
Not surprising is the fast, unthrottled connections in Dallas and London had less of a benefit. London, however, did have a significant fully loaded page time reduction of 1.6 seconds.
In terms of data, I made huge strides by reducing data 11 MB and 9 MB for desktop and iPhone, respectively. I have more work to reduce data by 835 KB to hit my goal of a 1 MB total page size.
What is left on the table?
In each of these Turtle to Rabbit articles my goal is to make a significant difference in as few steps as possible. I have achieved that here, but sometimes I may leave some fine-tuning on the table.
In this case there are a couple things I could do to squeeze out a few more KB:
- Generate images with exact dimensions. For example, desktop uses a 300 pixel wide image for the reviewer pictures and iPhone uses a 768 pixel wide image. I could provide the exact 200 and 400 pixel wide images thus saving some data. I may write a separate article to cover how to do this.
- Serve WebP formatted images to browsers that support it. WebP is a modern image format that saves even more data. I do plan on serving WebP images later on in this series.